

How To Increase Sound Level From Rx-v663
Setup & Tests
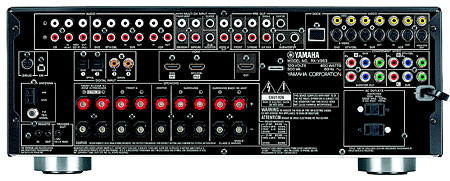
As I mentioned earlier, the Yamaha RX-V663 has just ii HDMI inputs, which is one of its biggest drawbacks. A year ago, this would have been appropriate for an AVR at this toll, but some new models now take 4 HDMI inputs, including the Onkyo TX-SR606 that I recently reviewed for Home Theater. (UAV volition publish a separate review of the TX-SR606 soon.) In addition to the pair of HDMI inputs, there are three component inputs along with several S-Video and composite inputs. There are as well eight analog input jacks for discrete multichannel sources and eight pre-outs if y'all prefer to utilise outboard amplification.
Yamaha's YPAO is a proprietary motorcar-calibration system, though the basic process is the same equally all other such systems. Using a supplied microphone, the AVR emits exam tones from the speakers, analyzes the data, and determines the size, distance, and levels for all your speakers. Additionally, it sets one of three EQ patterns to provide the all-time frequency response in your listening space.
Unfortunately, YPAO was non as uncomplicated to set up equally it should take been. After y'all plug in the mic and the onscreen carte du jour comes up, there are a few options y'all need to set before calibration tin kickoff. It took me a couple of tries to figure this out, and I'k pretty seasoned when information technology comes to setting upwardly AVRs. If I find something a tad confusing, I immediately become concerned about the average consumer.
Prior to starting the scale process, you must select the EQ type—Natural, Apartment, or Front—to determine the frequency-response curve associated with the auto setup. I tried two of the EQ types to see how much divergence there is between them, starting with the Flat setting. I used "Nothing At All" from Santana's Shaman CD equally the reference audio for this role of my testing.
In the Flat way, center imaging was slightly skewed to the right, and the bass was but too heavy, defective definition and clarity. So I redid the auto setup after changing the EQ setting to Natural. Center imaging of the vocals improved, and the bass was smoothed out a bit, simply it was still overwhelming. Moving to the seat behind the master "sweet spot," the bass had a more distinct kick, though standing waves became more credible.
Herein lies one of the main disadvantages of YPAO compared with other auto-setup systems, particularly the Audyssey system found in Denon, Onkyo, and other manufacturers' AVRs. YPAO only balances the organization for the sweet spot. Once you exit that position, the sound tin can alter pretty dramatically. Audyssey configures the system for several listening positions, allowing more than one person to enjoy the best possible sound.
Like well-nigh auto-setup circuits, YPAO prepare my main left and right speakers to "large." Withal, I prefer to set them to "small-scale," sending all low frequencies to the subwoofer, which provides a smoother bass response in my 10x17-pes media room. I prepare the subwoofer crossover to 80Hz, and the bass was immediately cleaner and tighter in the sugariness spot and the back of the room.
Overall, the quality of sound was still somewhat muffled and ill-defined, then I decided to practise more transmission tweaking to better performance. I didn't demand to change whatsoever of the levels or speaker distances, but I wanted some additional command over the EQ. Unfortunately, I could non alter the pre-defined Natural EQ setting, but I was able to switch to the user-adjustable graphic EQ.
Making adjustments primarily to the mid and high frequencies, I got the Santana vocal to sound more live and vital. There was greater vocal presence with clearer and more distinct item of instruments such equally the acoustic guitar. However, when I turned up the volume, there was audible distortion. Switching dorsum to the Natural (auto-setup) position, there was less distortion and fewer signs of stress on the amplifier at louder volumes.
I chose not to utilise the tone controls considering they merely offer a bones boost and cut (-6dB to +6dB) at 3.5kHz and 350Hz. All frequencies to a higher place 3.5kHz and below 350Hz are affected equally, which is not all that useful.
During the course of my review, I never got the RX-V663 to sound exactly equally I wanted nether all conditions. If my experience is any indication, you lot may have to experiment quite a fleck until you observe the settings that work best in your infinite.
Every bit I mentioned earlier, the V663 offers minimal video processing, then in that location wasn't much to exam in that regard. Nevertheless, it should exist noted that the AVR clips above-white and below-black from video signals passing through it.

How To Increase Sound Level From Rx-v663,
Source: https://www.soundandvision.com/content/yamaha-rx-v663-av-receiver-setup-tests
Posted by: presleyhimese54.blogspot.com
0 Response to "How To Increase Sound Level From Rx-v663"
Post a Comment